This is where measurement is VERY CRITICAL ; however, the basis of the calculations are quite simple and only involve simple arithmetic. The telescope operates by collecting a large amount of light at the primary mirror and focusing it at a point; this is the mirrors focal length-you need to know the focal length of your mirror. The secondary mirror reflects (bends the path of the focal length) this light at 90 degrees through an eyepiece which magnifies the light (thus the image). The position of the eyepiece in relation to the primary mirror is the important part-place it outside the focal point (either before or after) and you will never be able to see anything-the sketch below gives a clearer idea of what I mean:
Assuming the mirror cell assembly is secured in tube: (and you know the focal length of your mirror) we can get some important measurements-these are all in mm (metric):
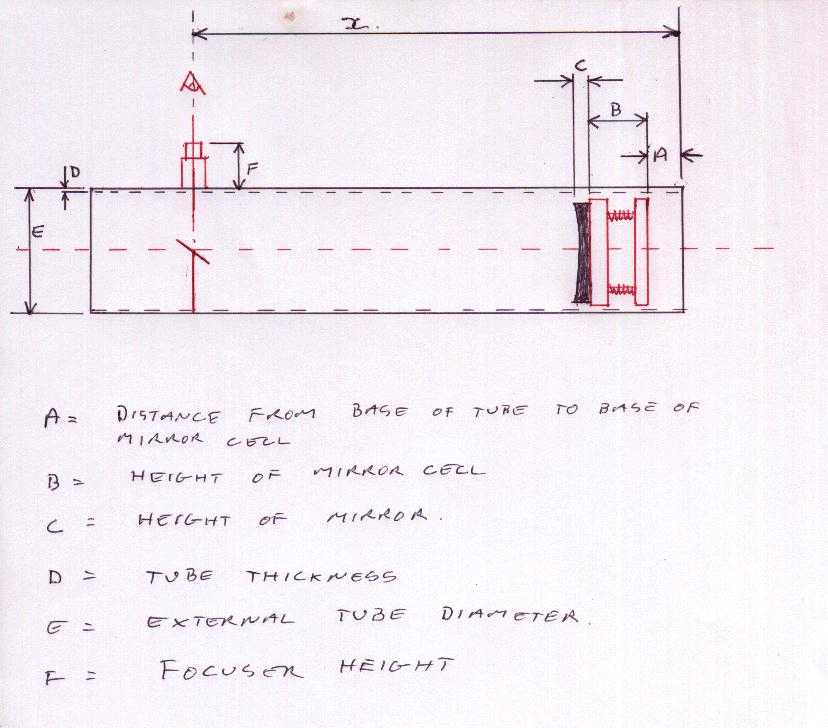
first the tube diameter, measure outside diameter of tube-this gives dimension (E).
then the wall thickness of the tube-dimension (D).
then the height of your focuser (whether shop purchased or home made)-dimension (F).
and allow, say 12.5mm for focuser travel.
With the primary mirror cell assembled in tube you can measure the distance from the tube base to mirror cell base-dimension (A), then remove cell assemble and measure to find dimesions (B) and (C). From all of the above you can now calculate dimension (X); the distance from the tube base to the point where you want to make a hole for focuser in the tube. Below is an example-basically using data from my own assembly.
Focal length (Fl)=1231mm
A-tube end to base of cell=40mm
B-base of cell to top surface of cell=65mm
C-top surface of cell to mirror surface=28mm
D-tube thickness=5mm
E-external tube dia=200mm
F-focuser height=73mm
12.5mm-"allowance" for travel.
To get X we take Fl-E/2-D-F-12.5+(A+B+C)
in my case this was 1231-200/2-5-73-12.5+(40+65+28) this gives
1231-100-5-73-5+(133)
So I measured 1173.5mm from the tube base, marked a spot and drilled a pilot hole before using a hole saw cutter to match as close as possible the internal focuser diameter. Just make sure you check your measurements before cutting material-you don't want to end up with patched up holes all over the place!
Next you need to get the secondary mirror in place-I drilled about seven holes incorrectly before I got it sorted out, the only easy way around this is to either buy (or make) a proper spider to hold mirror-I, of course, used the cheapo option below, a mirror on a stick!:
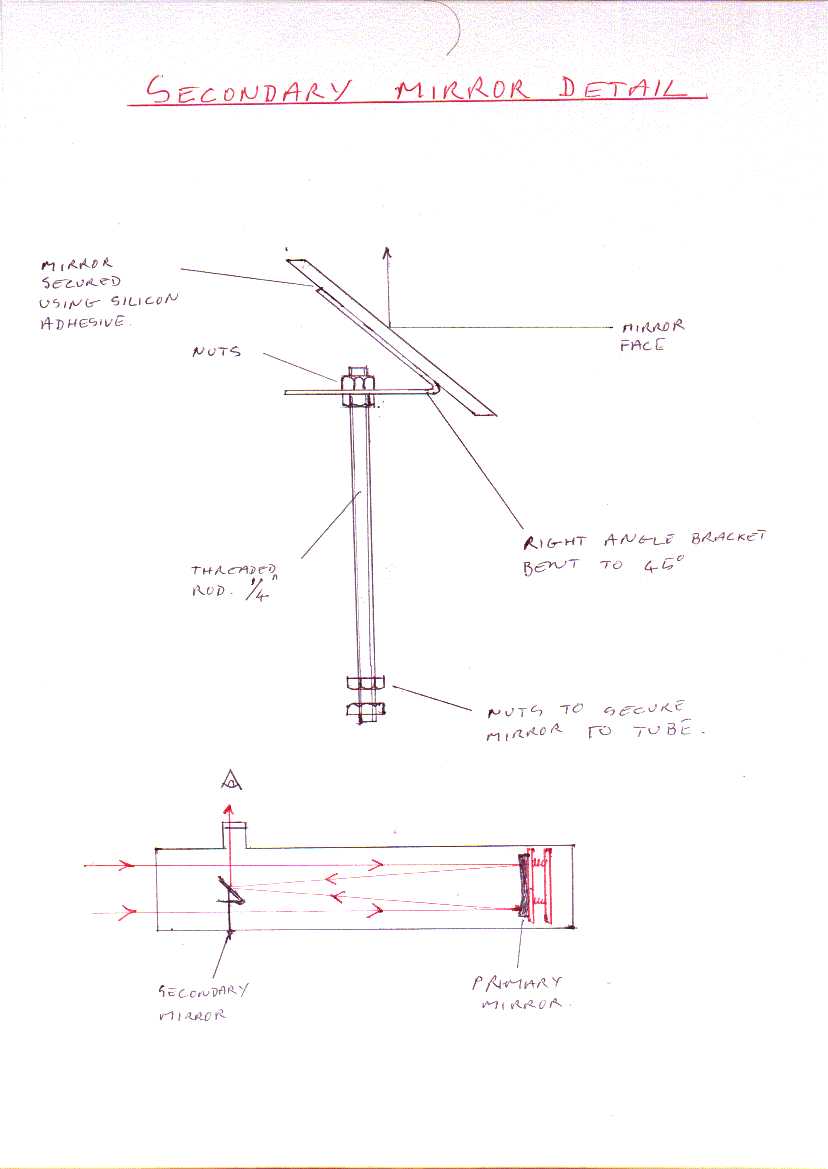
Well, its really a mirror glued (silicon adhesive) to a right angle bracket-bent to exactly 45 degrees-(use a protractor)-secured to threaded rod using bolts-you can think up mods etc yourself-this is simplest principle I found and it doesn't cause any discernible diffraction problems that I can define. Positioning is important-when you look down focuser you want to be able to see an image of your eye reflected back from primary via secondary-get someone to hold mirror in position before you start drilling-its a bit trial and error-once in place you can bend it to "fine tune" the position-when you get it right and secured properly it can take some fairly rough punishment without the need for realignment.
Now we can go two ways here, really cheap & nasty or proprietary kit which can be expensive and nasty!-check second hand-you may find reasonable rack and pinion stuff going at a good price-if not, try my idea-a basic friction focuser made from a plumbing connector in finest PVC-I have had no trouble with this-focusing is simple, and when the end piece is twisted it locks eyepiece in place and it doesn't jump out of focus at all-so it works and is cheap as well-you can always upgrade later!
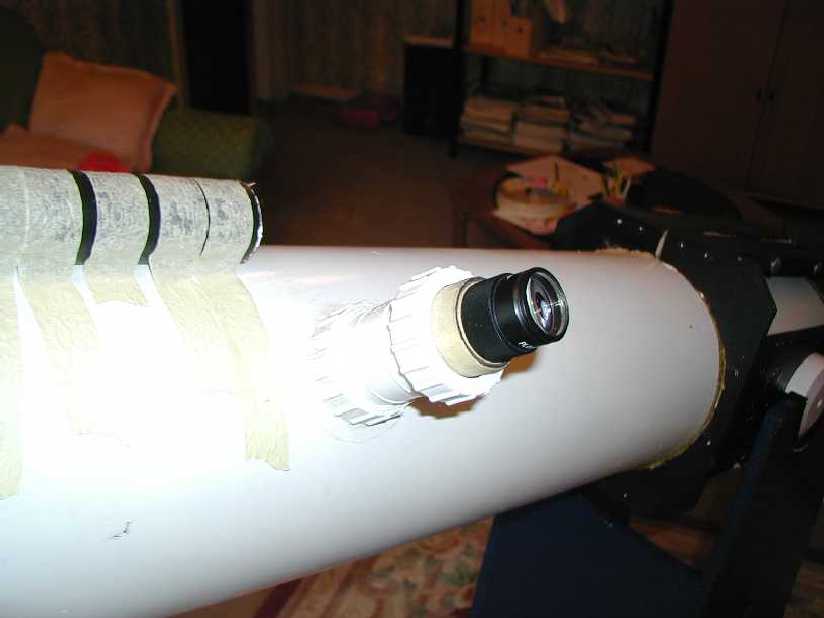
The PVC focuser is a plumbing piece-for connecting 2 bits of pipe together-each end has a threaded end piece which can be screwed on and off-when used for its original purpose you pop in 2 bits of pipe at each end and screw the end pieces by hand, these squeeze a rubber ring on to each piece of pipe and seal the joints-for our purposes we need to take off one of the threaded end pieces and carve it up a bit so it fits roughly onto the curved surface of the tube-this can then be screwed in place-gaps between this part and the tube can be filled with plastic padding to make it look neat and more secure-then screw the rest of the focuser onto the part now on the tube and you have the focuser fitted. This is still not finished ie you will not be able to fit your 1.25" dia eyepiece straight into this assembly. Get a piece of PVC pipe (to suit the internal dia of your connector) cut to about 3"-now put your eyepiece into this-you may need to increase the external dia of your eyepiece to get a good tight fit-you want it fairly tight-I just wrapped masking tape around the eyepiece barrel until I achieved this requirement. Once you have the eyepiece assembled in its bit of PVC pipe you can pop this into the focuser, tighten the top ring and it is secured in place!-study the pictures to get a better idea of assembled part.